
The wall starts out as a flimsy single layer of welded wire. Minor irregularities become part of the tank and tend to grow into unattractive flat spots or bulges. Flats and bulges are often next to each other and thus even more noticeable, especially on larger tanks.

Inspect for verticals that are too far in or out even though they are vertical. Bend out of line verticals in or out and make them vertical again after the first horizontal reinforcing bar is in place and completely tied. The idea is to adjust vertical bars to meet the circumference without distorting a smooth circle. Vertical bars that were bent to meet the circumference are adjusted vertical with a level after the first horizontal circumference is firmly tied to all vertical reinforcing bars. Repeat this horizontal circumference bar procedure twenty centimeters above the first horizontal with #4 bar (1.25 cm). Check again for level and vertical.
Overlap the horizontal reinforcing steel bars thirty centimeters or more. For larger tanks, when the first bar is harder and larger, it is easier to lap weld and work with twelve to eighteen meter lengths. Manually bend the final lap joint to position the steel flat against the wall. Even the smaller bar sizes will occasionally resist all efforts to make a neat overlap which is flat to the wall surface. Manually bend protruding bars into the circumference arc with repetitive small bends rather than one bend.
The first tie of horizontal reinforcing steel is always made at the center of the bar. Start at the center of an eighteen meter bar and do the same with a one meter bar. Leave the last 60 to 100 centimeters of each bar untied. The loose ends of the overlap are then tied together; starting at the center of the lap joint.
Walk each end of the reinforcing bar toward the tank circumference, hold the ends in loosely with a two meter length of wire, then go back to the center and tie the horizontal steel to the next vertical bar on either side of the first tie. Walk the ends in toward the wall further and hold them in place by moving or shortening the long wire. Then go back toward the center and make more ties to vertical steel. This job is either for one or three people; a person at each end of the horizontal reinforcing steel bar can replace the loose wire ties and make the job quicker.

Inspect for verticals that are too far in or out even though they are vertical. Bend out of line verticals in or out to maintain a smooth circumference line. Adjust them to vertical again after the first reinforcing bar is in place and completely tied. Now repeat the circumference wrap procedure twenty centimeters above the first horizontal with #4 bar (1.25 centimeters). Check again for level and vertical.
The above procedure is somewhat different than the accompanying pictures of a small open tank. The main difference is that the floor concrete is not be placed separately for this small project. The first inner layer of welded wire is attached to the floor steel. Higher walls and a roof will be added in later chapters.
An old partner and good friend once built a forty cubic meter tank without cementing the floor first. His plan was to cut down on expenses and he would have done so but for a strong wind which blew the almost finished tank armature off the mountain top. He and his crew eventually hauled it back up the mountain, banged it back to round, and plastered it. The tank is a good one and has been in service for many years with no problems.
Flip the nineteen meter length of welded wire over and roll it up loosely backwards to relieve wire strain from the factory roll (one meter plus diameter roll). Unroll and flip back over again. Re-roll even more loosely in the original direction and stand the roll up inside the tank, next to the wall. Loosely tie one end of the roll to horizontal steel. Unroll the standing welded wire around the inside of the tank wall until the approximate mid point is reached. Tie the welded wire to the upper horizontal bar. Use a vertical on the welded wire so it can slide up and down a little.
Use imagination to view this roll technique as welded wire inside a tank which is bein unrolled and attached to lower bars.

Place the fine steel metal lath inside the tank before the wall circumference of welded wire is completed. Now is the time.
Loosen the first tie and let the first half of the welded wire roll to a stable position. This step is crucial to tank roundness. Work in both directions from the center of the welded wire as pictured above with fine mesh instead of welded wire. If the key steel is vertical and the inside layer of welded wire is unrolled and attached level, the finished wall will be vertical and free of flat areas or bulges. Do not hurry this first layer of welded wire. Make sure it is tight against the vertical bars, which are inside the horizontal bars, pull the welded wire only to within 1.25 centimeters of the horizontal steel bars, which are 1.25 centimeters outside the vertical bars in the key. This will avoid distortions in the plane of the welded wire.
Center cut the bottom wire every one meter between verticals to relieve inward pressure from the key. Slightly bend these cut tails toward the key so they do not protrude from the final plaster surface.
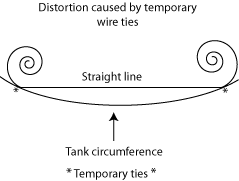
Do not tie the inside layer too tight at first and avoid ties of vertical welded wire to vertical bars until the first layer is neatly in place. This step provides for slippage; when verticals are tied there can be no lateral slip. Lateral slip facilitates correct position. The task here is to avoid stressing the wire. Place it smooth. The main problem at this stage is introduced by unrolling the wire ahead and securing it with a temporary wire. Do not forget to loosen the temporary wire, which becomes too tight very quickly. The shortest distance between a temporary wire and the work area is a straight line; the tank is supposed to be round.

Straighten any verticals which are slightly bent before placing them on the wall. Tie the verticals securely inside the first two bands of horizontal steel and against the inner layer of welded wire. These bars do not need to be spaced perfectly. Nor do they all need to be tied to the vertical bars in the key. Tie verticals firmly to the first two horizontal bars. Put a loose tie to the welded wire at approximately 150 centimeters of height.


Skip one position upward. Place the first horizontal reinforcing bar sixty centimeters up from the first bars that were attached to the vertical steel in the key joint between floor and wall. Then go back down thirty centimeters and place the skipped bar. Now finish the higher horizontal wraps.
Never try to pull reinforcing bar steel into round with a tie to the welded wire, this will cause a distortion in the welded wire which will create a bulge or flat spot somewhere else in the tank wall.
Adjust the fifteen centimeter squares of the inner and outer layers to make 7.5 centimeter squares. Position the outer layer down 7.5 centimeters relative to the inner layer. Center cut the bottom horizontal wire every one meter to relieve the outward pressure of the wall key.
Work from the center and tie the outer layer pieces only enough to hold them in place at first. Measure and place the last piece so that it overlaps forty-five to sixty centimeters on each end.
Complete the ties after the last piece of outer welded wire has been minimally secured in position. Work in a pattern similar to tightening the lugs of a tire. For example, divide the circumference into fifths and temporarily mark these locations with stakes. Tie the layers securely together at each spot starting at center height and working up and down. Call the first spot one, after it is complete, go to number three, and then five, before finishing number two and four. Gradually fill in untied areas from the center after all five division spots are tied. It is best to do this in the same five spot pattern and go around the tank several times (five is an arbitrary number, six or four is fine, too).
Do not tie the top fifteen to twenty centimeters completely because tails from the roof steel will extend into the wall steel thirty to 45 centimeters. Occasional ties may need to be removed at that time. Note that the top of the outer layer of welded wire is 7.5 centimeters below the top of the inner layer.

Insert at least fifteen centimeters into the bending form. Never let go of the steel! Slowly walk one way to bend the steel reinforcing bar around the circular form. Walk slowly backward to relieve the tension. Be careful! Danger!
